Configuration Guides
This section provides help on configuring your client devices for
DHIS Updates. We aim at making it as complete and with as
many different clients, devices and configurations as possible.
If your device/client/configuration is working and is not listed here and if you
would like to help other users,
please send us instructions and screenshots
for your specific device/configuration and we will publish them on this page.
Software Clients
Hardware Clients
R5 DHIS Client (dhid)
This is the classical DHIS Update method. You need a DHIS dhid client which you
can either find on your operating system's ports or package collection or
you can download the source code from ftp://ftp.dhis.org/pub/dhis/dhid-5.5.tar.gz.
If you are compiling it and want to have built in QRC authentication you will need to
install the GNU multi-precision library (gmp). You can get it from
here.
Read the provided INSTALL, README and dhid.conf.sample files.
If compiling, uncompress the source code, cd to its directory, type "make".
You then need to create your DHIS host online and edit the dhid.conf file. By default this file
is installed under /etc/dhid.conf. Remmeber to protect it with chmod 600 /etc/dhid.conf.
Edit the configuration file and add your DHIS host parameters; it should look something like this:
{
HostID YourHostID
HostPass YourPassword
ISAddr is.dhis.org
}
Run the dhid daemon and that's it; it should connect to the server, login with
the configured parameters and mark your host online.
DHIS on a UNIX server with wget and cron
DHIS can be configured in any UNIX based system with a simple cron job
and the wget utility. Just ...
- Install wget; if you don't already have it, start by grabing it from:
ftp://ftp.gnu.org/pub/gnu/wget/
- Configure a cron job under a user of your choice with something like:
*/5 * * * * /path/to/wget -4 -q -O /dev/null "http://YourHostID:YourHostPassword@is.dhis.org/"
And that's it; your host will always be online when you are connected.
You can also use wget to update an IPv6 address (AAAA DNS record). The only difference in this case is that
you need to ensure that the HTTP request is made using IPv6 and that you have IPv6 connectivity to the Internet.
This is the default of wget and can also be achieved with the -6 command line option.
The following cron line will enable the updating of your IPv6 address:
*/5 * * * * /path/to/wget -6 -q -O /dev/null "http://YourHostID:YourHostPassword@is.dhis.org/"
DHIS on a DD-WRT based router using DDNS
If you have a router with a
dd-wrt firmware you can follow
these instructions in order to make it update a DHIS host.
The following picture illustrates a working dd-wrt v24-sp1 voip
DHIS configuration; click upon it in order to view it in its full size.
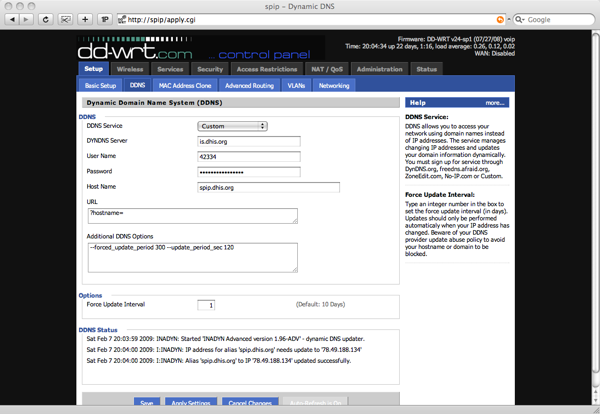
- 1. Make sure your router has a connection to the Internet and that
it is resolving DNS successfully (under Basic Setup)
- 2. Select Custom as the DDNS Service type
- 3. Use is.dhis.org as the DYNDNS Server
- 4. Provide your DHIS HostID as the Username and your DHIS
*HOST* password as Password.
- 5. The Host Name is ignored by the server since it is derived from the
HostID, but dd-wrt/inadyn complains if you don't specify one, so just put
your hostname there.
- 6. By default dd-wrt/inadyn will just push your hostname to the server.
Even if this is ignored, you need to make it a parameter in order for it
to work; insert "?hostname=" in the URL box. The actual hostname
will be appended to it.
- dd-wrt/inadyn will update by default every 360 seconds but will also
cache and not update if your IP address hasn't changed; this is not good
since DHIS requires your client to update periodically regardless of
whether your IP changes or not, so you need to tweak with its timers.
Add: --forced_update_period 300 --update_period_sec 120 to
the additional DDNS options.
This will make your router box refresh
your IP every 2 minutes if it changes or every 5 minutes if it doesn't
change.
- 7. The Force Update Interval is actually overwritten by 6. so it
doesn't really matter what you put there.
- 8. Save and Apply
And that's it; if everything goes well your router will then bring your
DHIS hostname online and keep it always up to date.
DHIS on a CISCO IOS based router
If you have a Cisco router with DDNS support
and you use this router to connect to the Internet and obtain a dynamic
IP address, you may also use it to update your DHIS hostname.
The following configuration was tested and found to perform well:
In global configuration mode:
router(config)#
ip ddns update method DHIS
HTTP
add http://YourHostID:YourHostPassword@is.dhis.org/
interval maximum 0 0 5 0
Under the
interface that gets the dynamic IP address, a Dialer
or something equivalent, add:
router(config-if)#
ip ddns update hostname YourHostName.dhis.org
ip ddns update DHIS
Finally, force an IP address change to trigger the dynamic
update. You can use
debug ip ddns update to troubleshoot.
This configuration will make your router update with the DHIS
server every 5 minutes.
You may also want to read:
http://www.cisco.com/en/US/docs/ios/12_3/12_3y/12_3ya8/gt_ddns.html
DHIS on a Thomson ST585v6 ADSL router
This configuration was tested and found to be working on an ADSL
Vodafone connection using a Thomson ST586-v6 router.
The first step is to add DHIS to the list of services as the custom service.
In order to do this you need to telnet to the router and execute the following
command on the CLI:
dyndns service modify name=custom server=is.dhis.org port=www-http request=/ updateinterval=300 retryinterval=15 max_retry=4
The next and final step is to configure the Custom service using the router's Web Interface.
Go to Dynamic DNS and enter your HostID as Username and your HostPassword as Password.
You may also enter the hostname on the Host box but this parameter is currently ignored by
the DHIS server since it is derived from your HostID.
The following picture illustrates the web based configuration:
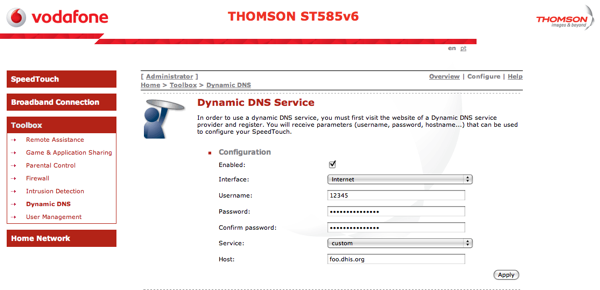
And that's it, the router should perform dynamic updates to the DHIS server and the
host should become online.
